Building a House
Construction StagesEssential
Septic Tank Connection & Drainage
Plan water supply and wastewater routes together so toilets, bathrooms, kitchens, and external drains work cleanly from day one.
10 min read· Last updated 12 Apr 2026
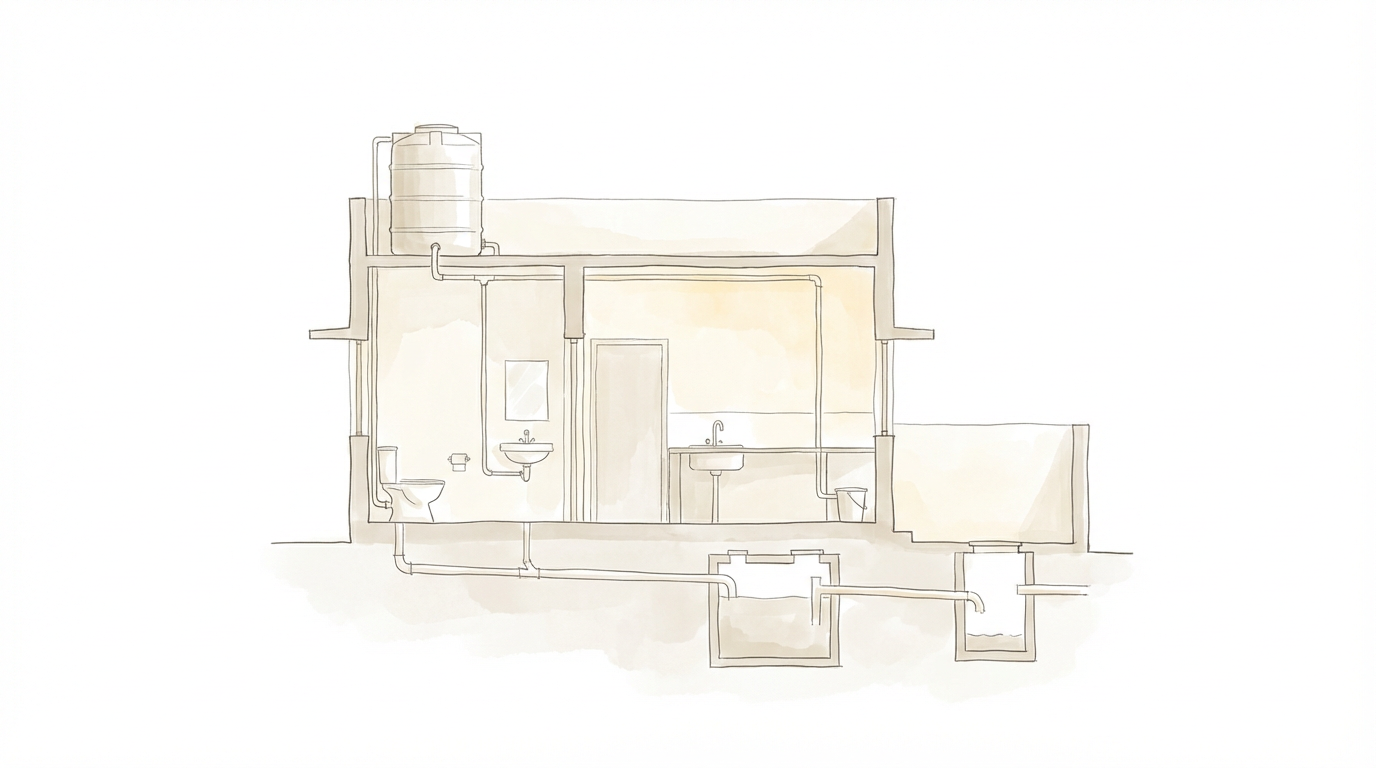
Why This Plumbing Stage Matters More Than Most Homeowners Expect
Septic tank connection and drainage planning is not just about joining a few pipes after the walls are built. It is the stage where the house water path and waste path are made practical. In a typical Indian home, the overhead water tank feeds the toilet flush, wash basin, kitchen sink, bath area, and utility points. At the same time, the used water must leave the house through the correct drainage route without backflow, smell, choking, or future rework.
Many self-build homeowners focus on tiles, fittings, and exterior elevation but leave drainage decisions to labour teams on site. That usually creates avoidable problems. If the line from the toilet to the septic tank is poorly aligned, or if bathroom and kitchen wastewater is mixed without a proper outlet strategy, the site may look finished but perform badly after occupancy. This becomes especially visible during monsoon months or when multiple bathrooms are used together.
This stage also connects three major decisions already made earlier in construction: where the overhead tank sits, where toilets and wet areas are located, and where the septic tank or soak pit is planned. In cities and developing plotted layouts around Lucknow, Patna, Indore, Hyderabad, and outer Bengaluru, good plumbing work usually comes from deciding these routes before finishing starts, not after.
- Plan supply lines and drainage lines together, not as separate jobs.
- Keep toilet discharge, greywater flow, and tank-fed water points clearly organized.
- Finalize routes before final finishing, plaster correction, and floor closing.
- Treat this as a usability stage, not just a hidden pipe stage.
- Check the full path from overhead tank to outlet point and then to disposal.
Understand the Full Water Path Before Any Final Pipe Connection
The easiest way to understand this stage is to see the house as two connected systems. The first is the clean water system. Water stored in the overhead tank travels down through plumbing lines and reaches the toilet flush, basin, kitchen, bath area, and other wash points. The second is the used water system. Once that water is used, it should leave through different drainage paths depending on the fixture.
The toilet line is the most important discharge line because it carries soil waste and should connect properly to the septic tank. The basin in the bathroom, the kitchen sink, washing area, and floor wash points usually carry greywater. Depending on the site layout and local sanitation setup, these lines may go to a soak pit, gully trap, drainage line, or another approved disposal path instead of being casually tied into the same toilet line. That distinction matters because the load, choking risk, and smell behaviour are different.
When the site team skips this planning and only focuses on where the pipe can fit, the result is confusion later. A homeowner may assume that every used-water line goes straight to the septic tank, but that is not always the correct arrangement. A better approach is to map every fixture and ask two questions for each point: where is the water coming from, and where should that used water go after use?
- Trace the inlet route from overhead tank to each wet-area fixture.
- Separate toilet soil lines from normal wash-water lines during planning.
- Check whether greywater should go to a soak pit, drain, or another approved outlet.
- Confirm the disposal path before floors, platforms, or external paving are finished.
- Do not assume every outlet belongs on one common waste route.
Tip:
How Water Should Travel from the Overhead Tank to Each Point
In most house-construction projects, the overhead tank is positioned where it can feed the main wet areas efficiently. Once the tank location is fixed, the supply line is brought down and distributed to the toilets, bathrooms, kitchen, and basin points. This is why the tank should usually be planned close to the side of the house that has the highest concentration of water-use areas. Shorter and more direct supply routes are easier to maintain and usually perform better.
The toilet is usually the first priority because a reliable flush point is non-negotiable. After that, the kitchen and bathroom basin lines should be routed to their marked locations, followed by bathing and wash points. On many Indian plotted homes, the most practical method is to keep the main distribution line simple and feed branches only where needed, instead of creating unnecessary crossing lines that later become difficult to understand during repairs.
This is also the stage where homeowners should watch for point positioning. A basin point should come exactly where the basin is meant to be fixed. A toilet flush line should align with the actual WC location. Kitchen supply should match the sink and counter plan. If the site team installs supply lines without confirming final fixture positions, the fittings may still “work,” but the room will feel badly planned and maintenance access will suffer.
- Bring the main supply line from the overhead tank through the most direct serviceable route.
- Prioritize toilet, bathroom, basin, and kitchen points in the distribution layout.
- Keep branch lines clean and logical instead of crossing wet areas randomly.
- Match every pipe point to the actual future fixture location.
- Review the route floor by floor if the house has multiple levels.
Connect Toilet Waste, Greywater, and External Drainage the Right Way
The toilet outlet should connect to the septic tank through a clear and properly aligned discharge line. This line should not be treated casually because it handles the most sensitive waste flow in the house. Sharp unnecessary turns, inconsistent slope, or poor connection work can cause choking, smell issues, or repeated cleaning calls after occupancy. If there are multiple toilets, the line strategy should be checked as one system rather than fitting each connection independently.
Greywater needs a separate logic. Water from the bath area, wash basin, kitchen sink, and washing machine or utility wash point may not always need to follow the same route as toilet waste. In many Indian homes, these are guided toward a soak pit, chamber, or external drainage arrangement depending on the plot setup and sanitation method. The exact system can vary, but the planning principle stays the same: let each category of wastewater go through the path it is meant for.
Site drainage around the house should also be considered here. If external outlets, rain splash zones, or service passages are left without planning, wastewater management becomes untidy very quickly. In towns where open drains still exist in front or beside plots, careless connection planning can create foul smell near entrances. In more organized layouts with internal disposal systems, poor grading or bad outlet planning can still cause water stagnation close to the building.
Warning:
- Connect toilet soil lines to the septic tank through a proper dedicated route.
- Decide greywater disposal separately based on the actual site sanitation plan.
- Avoid unnecessary bends and random joining of unlike waste lines.
- Check external discharge points so wastewater does not collect near the house.
- Think beyond the room and verify how the drainage leaves the full plot.
Practical Site Checks Before Closing the Plumbing Work
Before this stage is treated as complete, the contractor and homeowner should verify the actual line logic on site. Start at the overhead tank and confirm where the supply pipe drops. Then follow the route to the toilet flush point, bathroom basin, kitchen, and other wash points. After that, reverse the process and track where used water leaves each location. This simple walk-through catches many planning mistakes early.
Slope and access matter just as much as connection points. Drainage lines should not rely on guesswork. If a toilet discharge line runs with poor fall, or if a greywater outlet reaches a chamber awkwardly, the problem may stay hidden until the house is occupied. The same applies to inspection chambers, outlet points, and service access. A line that works only when brand new but cannot be cleaned or checked later is not a good line.
This is also a good stage to coordinate with civil work around the house. Tank platforms, side passages, chamber covers, and future flooring should not block maintenance. On self-managed homes in Kanpur, Ranchi, Coimbatore, and the outskirts of Chennai, a common mistake is finishing the external floor neatly and only later realizing that service access to a chamber or line is poor.
Use this checklist before closing or approving the work:
- The main water supply route from overhead tank to wet areas is clearly identified.
- Toilet flush, basin, kitchen, and bath supply points align with final fixture locations.
- Toilet soil lines have a confirmed route to the septic tank.
- Greywater lines have a confirmed disposal path separate from guesswork.
- External outlet zones do not direct wastewater toward the house base.
- Chambers, pits, or cleaning access points remain reachable after finishing.
- The owner or engineer has physically traced both supply and discharge routes.
- Walk the route physically instead of only trusting verbal site explanations.
- Verify slope, bends, and connection order before final closure.
- Keep inspection and cleaning access open for future maintenance.
- Coordinate plumbing closure with external flooring and utility work.
- Sign off only after both inlet and outlet logic are fully clear.
Common Mistakes That Lead to Bad Drainage After Possession
The first major mistake is planning only the visible point and ignoring the full route behind it. A homeowner sees that the toilet point exists and assumes the system is done. But if the line to the septic tank is badly laid, that visible point means very little. The second common mistake is treating all used water as one category and pushing it into whichever outlet is easiest to reach. That may save labour for one day but creates a weak long-term system.
Another mistake is poor coordination between rooftop tank placement and wet-area clustering. If the tank is placed without thinking about where bathrooms and kitchens are concentrated, the distribution line becomes messy and unnecessarily long. Similarly, if water points are given before fixture locations are really frozen, the system may technically function but the house becomes harder to use and maintain.
The final mistake is rushing into finishing without one last review. Plumbing is hidden work, so people tend to trust it blindly once the wall or floor starts closing. That is exactly when they should slow down. A ten-minute route check at this stage is far cheaper than repairing a wrongly connected drainage line after handover.
- Do not approve a plumbing point unless you know both its supply source and drain destination.
- Do not assume all wastewater should go through one common route.
- Avoid awkward tank placement that makes distribution longer and more complex.
- Recheck fixture positions before finalizing the last pipe connection.
- Review the full system once before closing civil finishes.
- Ask for correction early because hidden mistakes become expensive later.