Building a House
Construction StagesEssential
Plumbing Layout Planning
Plan concealed water lines before plaster so bathroom, kitchen, and utility points stay practical, leak-safe, and tile-ready.
10 min read· Last updated 12 Apr 2026
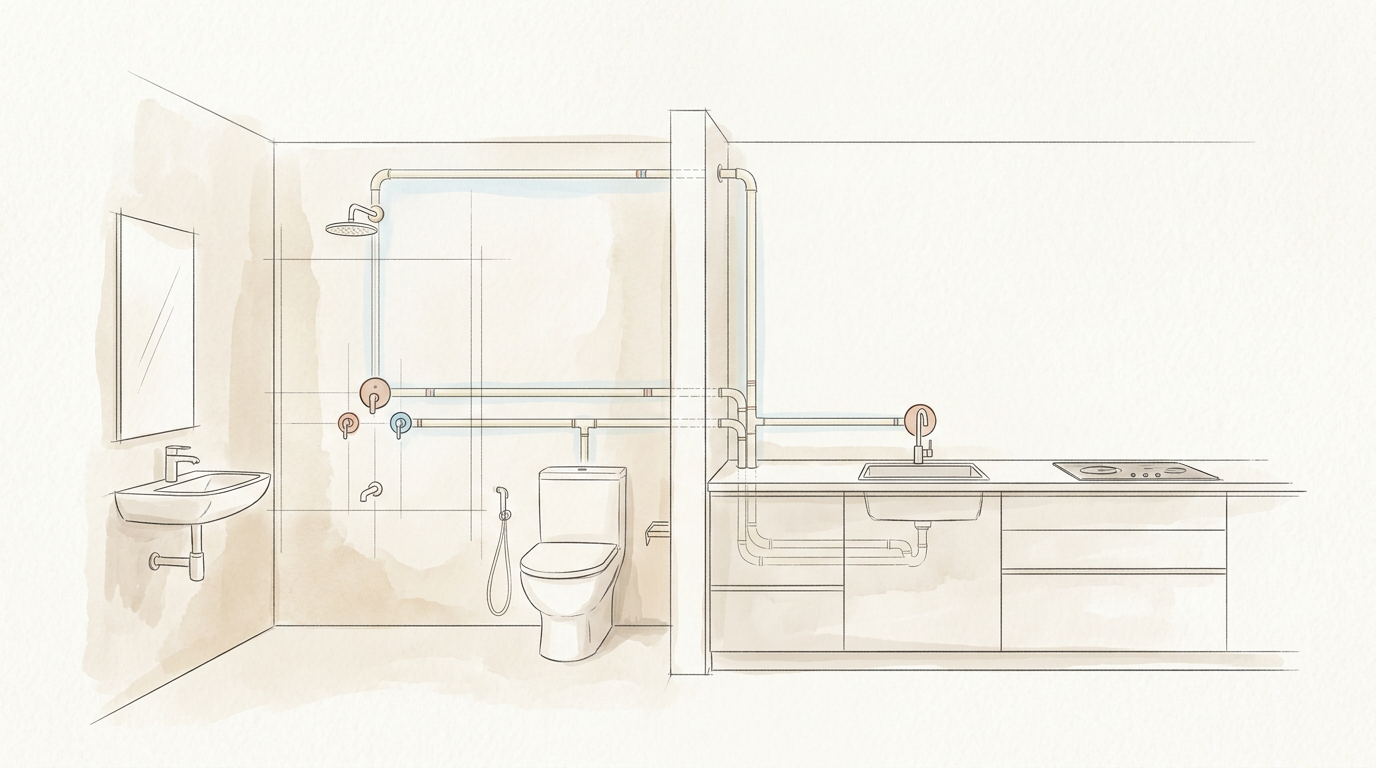
Why Plumbing Layout Planning Must Start Before Plaster
Plumbing layout planning is the stage where all water supply points are decided before wall plaster and tile work begin. In most Indian house projects, this is the moment when the team finalizes where the shower will come, where the wash basin mixer will sit, where the geyser line will rise, and how the kitchen sink line will connect. If this planning is delayed, the mason may finish plaster first and then the wall has to be cut again, which wastes labour, weakens finish quality, and creates avoidable rework.
For homeowners, the biggest mistake is treating plumbing as only pipe installation. It is actually a planning exercise that affects usability for years. A well-planned layout keeps tap heights comfortable, pipe routes short, maintenance simpler, and tile cutting cleaner. In plotted homes across Noida, Lucknow, Indore, and Hyderabad, concealed plumbing works best when the layout is locked before plaster and before the tile pattern is finalized.
This stage also helps coordinate plumbing with electrical conduits, bathroom fixture placement, and wall finishes. If the water points are marked first, the site team can avoid conflicts between switch boxes, flush tank niches, mirror lights, and plumbing outlets. That makes the next stages faster and much more predictable.
- Start plumbing layout planning before final plaster work begins.
- Fix all bathroom, kitchen, balcony, and utility water points in advance.
- Coordinate plumbing with electrical and tile layout at the same time.
- Avoid post-plaster chasing because it increases cost and finish defects.
- Treat concealed plumbing as a planning stage, not just a pipe-fitting stage.
Mark Every Fixture Point and Height Before Wall Cutting
The first practical step is wall marking. Before any chase is cut, the site should mark the exact location of each point with chalk or marker. This includes hot and cold lines for basin mixers, shower mixer position, overhead shower height, health faucet point, kitchen sink inlet, washing machine point, and any future geyser connection. When points are not marked clearly, workers often decide positions by habit instead of by room use, and that leads to awkward tap heights or off-centre fittings.
Good marking should always follow fixture planning, not guesswork. For example, a wall-hung basin in a compact Bengaluru apartment bathroom may need different mixer placement than a larger family bathroom in Jaipur or Patna. The same applies in kitchens, where sink location, RO point, and utility washing point should suit the counter layout. If the owner has already selected sanitary fittings or at least approximate fixture sizes, the plumber can leave much cleaner and more accurate outlet positions.
This step is also the right time to confirm whether the building uses municipal supply, borewell water, overhead tank, or both. In many Indian homes, supply pressure changes by floor and by source. Planning the line route early helps the contractor decide where pipe sizes should remain larger and where reduction is acceptable near the terminal fixture.
- Mark each water point on the wall before any cutting starts.
- Match outlet heights to actual basin, shower, geyser, and sink planning.
- Check the kitchen, bathroom, balcony, and utility separately instead of using one standard height everywhere.
- Confirm hot and cold line requirement before laying concealed pipes.
- Factor in water source and pressure conditions while finalizing routes.
Tip:
How to Cut Wall Chases for Concealed Plumbing Safely
Once the points are marked, the wall chase has to be cut in a controlled way. The aim is to create a straight path for the concealed pipe without over-breaking the wall. On most residential sites, the chase is first cut with a wall cutter or grinder along the marked line and then opened carefully with hand tools. This gives a cleaner groove and reduces random breakage around the pipe route.
A common site mistake is cutting a chase that is too narrow, too deep, or badly angled around bends. CPVC pipes do not like forced bending, so the wall cut should allow proper fittings where the route turns. If the line has to change direction, the chase must be widened locally so the elbow or fitting sits comfortably inside the wall. Rough breaking with a hammer alone may seem faster, but it often creates uneven grooves and makes later plaster patching harder.
The contractor should also avoid chasing walls casually after the layout is approved. In bathrooms and kitchens, repeated cutting weakens the surface and increases the risk of hollow plaster later. On projects in Ahmedabad, Nagpur, and Coimbatore, the best concealed plumbing work usually comes from one clean chase cycle done after proper marking, not from repeated adjustments over several days.
- Cut the chase after complete marking, not while deciding the route on the spot.
- Use straight cutting lines first so the groove remains controlled and neat.
- Open extra space only where fittings, bends, or junctions need room.
- Avoid forced pipe bending inside a tight wall chase.
- Keep the wall damage limited so plaster repair remains strong and even.
Warning:
Choosing CPVC Pipe Sizes, Routing, and Fittings Properly
For internal water supply in most Indian homes, CPVC is the standard choice for concealed plumbing lines. The main route may enter with a larger diameter and then reduce near individual fixtures depending on load and room type. The exact sizing should follow the project requirement, but the principle is simple: keep the main distribution line adequate, reduce only where needed, and avoid unnecessary diameter changes inside the wall.
Routing should stay logical and serviceable. Bathroom lines should rise in a neat vertical route toward basin, shower, and health faucet points. Kitchen lines should stay coordinated with the sink cabinet and backsplash zone. Utility lines for washing machine or wash area should not interfere with future drain slope or electrical sockets. When hot water is planned from a geyser, the hot and cold lines should be separated clearly so the finishing team does not confuse them after plaster.
This is also where fitting quality matters. Elbows, tees, reducers, wall mixer arrangements, and terminal adaptors should be planned as part of the route, not added casually later. In self-managed houses in Pune, Ranchi, and outer Delhi NCR, pipe quality is often checked but fittings are overlooked. In concealed work, however, cheap fittings can be just as risky as poor pipe because once the wall is closed, replacing a faulty concealed joint becomes expensive.
- Use CPVC or the approved plumbing material consistently for internal supply lines.
- Keep main distribution lines adequately sized before reducing near fixtures.
- Route bathroom, kitchen, and utility lines in clean vertical or planned horizontal paths.
- Separate hot and cold layouts clearly where geyser-fed lines are planned.
- Buy reliable fittings because concealed joints are costly to repair later.
Fixing Pipes, Jointing Correctly, and Protecting Outlet Points
After the chase is ready and the route is finalized, the concealed pipe should be fixed firmly inside the wall. The line should sit with enough support so it does not shift when plaster is applied. Clamps or local fixing support help hold the pipe in alignment, especially around point outlets, bends, and mixer zones. If the line is left loose, even a correct route can move slightly and later produce crooked outlet positions on the finished tile surface.
Jointing needs the right method for the right connection. Solvent cement is typically used for pipe-to-pipe CPVC joints, while threaded terminal points need proper sealing material such as PTFE tape where applicable. The important part is discipline: clean the joint area, use the correct joining material, and avoid rushing the connection. Concealed plumbing failures often come less from the visible pipe and more from hurried joint work done under time pressure.
Once outlet points are ready, they should be protected before plaster and tiling. Temporary caps or end protection keep mortar, dust, and debris from entering the line. This matters because after wall finishing begins, small amounts of cement slurry can easily block or contaminate the outlet opening. On active sites in Chennai, Bhopal, and Surat, capped points usually remain cleaner and easier to identify during final sanitary fitting installation.
- Fix pipes firmly inside the chase so outlet alignment does not shift.
- Use the correct joining method for solvent joints and threaded connections.
- Do not leave mixer points or tap outlets unsupported inside the wall.
- Cap or protect every exposed outlet before plaster begins.
- Recheck all joints before the wall is closed permanently.
Pre-Plaster Checks and Common Plumbing Layout Mistakes to Avoid
Before the wall is patched and plastered, the full concealed plumbing layout should be reviewed one last time. This is the best stage to verify that point locations are correct, fittings are secure, and routing does not clash with tile lines or fixture positions. If a correction is needed, it is still manageable now. After plaster and wall tiles, the same correction becomes messy, costly, and visually obvious.
The plaster itself should also be handled with finishing in mind. In many bathrooms, the final wall finish will include tiles, so the site may leave the repair zone compatible with the tile-setting process rather than over-finishing it like a final painted wall. This is especially important around mixer bodies, shower arms, and basin points where the exact face level has to match the future tile thickness. A wall patched without tile depth awareness can leave the plumbing fitting either too recessed or too exposed.
The most common mistakes are simple but expensive: marking points late, cutting random chases, using poor fittings, failing to cap outlets, or forgetting to coordinate plumbing with tile and sanitary layouts. Owners should insist on a final site walk before approval. That one check often saves rework, broken tiles, and future leak complaints.
Use this checklist before allowing the chase to be closed:
- All basin, shower, geyser, kitchen, and utility points are marked and fixed at final position.
- Pipe routes are straight, clean, and not forced through tight bends.
- All concealed joints are completed with the correct joining method.
- Outlet points are capped and protected from plaster debris.
- The plumber, mason, and tile team agree on final wall face level.
- Hot and cold lines are identified clearly where applicable.
- The owner or engineer has checked the layout once before plaster.
- Recheck outlet location before plaster because later changes are destructive.
- Confirm tile thickness and fitting depth at mixer and shower points.
- Coordinate the mason and plumber so the wall finish supports final fitting alignment.
- Do not close the wall until every outlet is capped and every joint is checked.
- Use one final inspection to catch layout errors while correction is still cheap.