Building a House
Construction StagesEssential
Excavation and Foundation
Dig the right depth, prepare the base properly, and build a stable foundation before plinth work begins.
10 min read· Last updated 12 Apr 2026
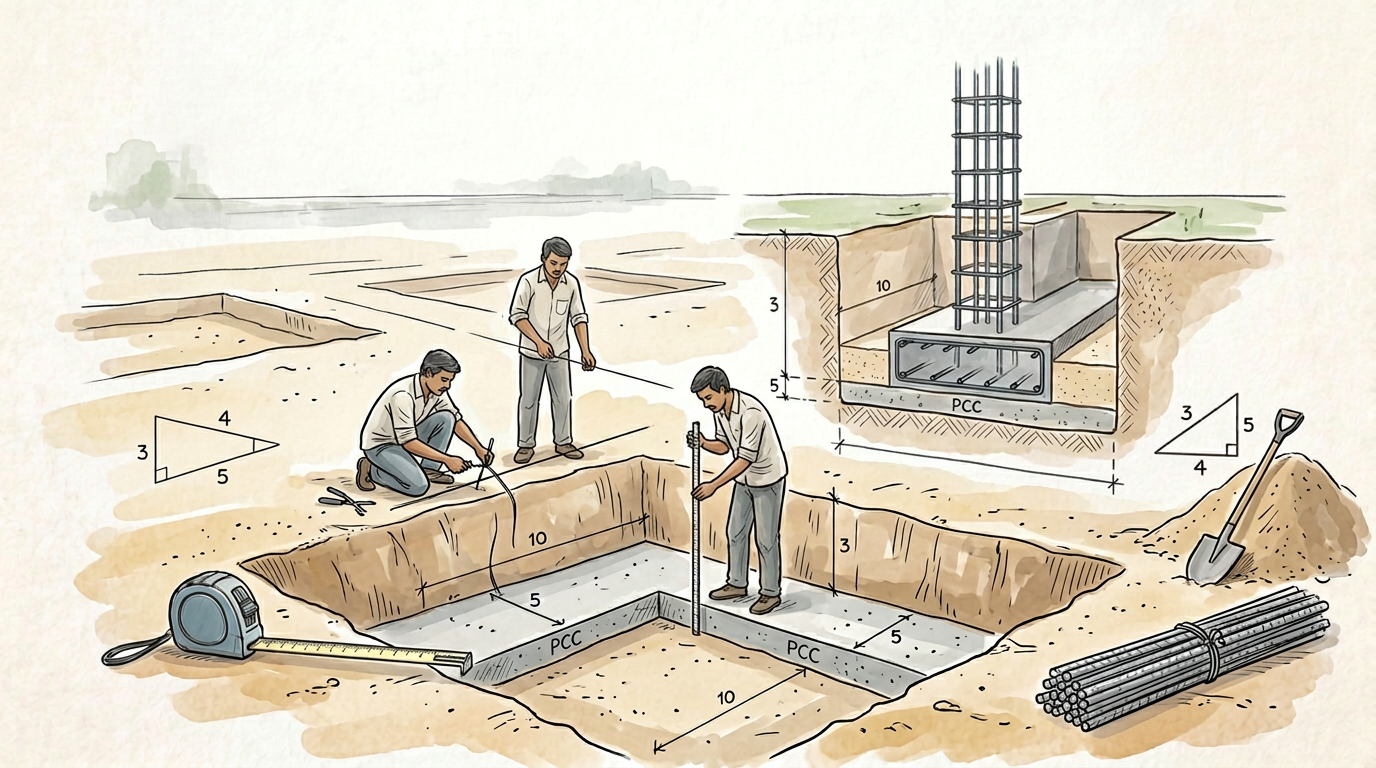
Why Excavation and Foundation Matter So Much
Excavation and foundation work are where house construction becomes real. Until this stage, everything is planning, measurement, and layout. Once digging starts, you are creating the structural base that will carry the weight of the house for years. If this stage is rushed, corrected later, or done without following the drawing, the entire building can suffer.
For most plotted homes in India, this is the point where homeowners hand over too much control to labour teams without understanding what is happening under ground level. That is risky. Even if your house is only a ground floor or G+1 home, the excavation depth, footing width, PCC layer, and reinforcement details all need to match the structural design.
In cities and towns such as Lucknow, Nagpur, Patna, Indore, and Raipur, many residential projects look simple from outside but still depend on careful structural execution below ground. A beautiful elevation means little if the foundation work is weak, uneven, or guessed on site instead of built according to plan.
- Treat foundation work as an engineering stage, not just labour work.
- Follow the drawing, not verbal assumptions on site.
- Confirm excavation, footing, and column details before digging starts.
- Understand the sequence from soil cutting to reinforcement placement.
- Do not rush because this stage becomes hard to correct later.
Start Excavation Only After Layout and Centre Lines Are Fixed
Before excavation begins, your layout marking should already be complete. The site must have verified plot boundaries, fixed building lines, and clear centre lines for columns and footing positions. Excavation should never start on a "rough idea" of where the house will come. Once a JCB starts digging, bad layout decisions turn into extra cost immediately.
The usual process is to take the layout reference thread and establish the centre line for each column location. These centre lines help define where the footing will sit. From there, excavation is carried out according to the footing and foundation size shown in the structural drawing. If the site team starts digging without preserving reference points, rechecking the footing position later becomes difficult.
This matters even more in compact residential plots where every foot affects setbacks, room dimensions, and future wall positions. In a 25x40 or 30x50 plot, a small shift in excavation can affect the whole line of the structure. That is why homeowners in places like Prayagraj, Kanpur, and Gaya should ensure that the engineer, supervisor, or contractor is working from the exact latest drawing on site.
- Complete land survey and layout marking first.
- Fix centre lines using the reference thread before excavation.
- Keep footing positions aligned with the column grid.
- Protect site reference marks during digging.
- Recheck dimensions before the excavation machine enters the plot.
How Deep Should House Foundation Excavation Be
The exact excavation depth depends on the structural design, soil condition, and number of floors planned. For many small Indian houses, especially one-floor or two-floor homes, a common working range is around 3 to 4 feet for the foundation trench, and many sites use 4 feet as a rough benchmark. But that should never replace the structural drawing.
A common mistake is to dig exactly the visible footing depth and stop there. In reality, the base preparation may require additional allowance for sand filling and PCC. That means the actual excavation can go deeper than the final structural depth you have in mind. If the drawing and site section call for it, the trench should accommodate base layers below the footing level, not just the footing itself.
The soil itself also changes the requirement. In black cotton soil, loose fill, low-lying plots, or reclaimed sites, engineers may specify different depths or wider footing geometry. In cities like Hyderabad, Ahmedabad, and parts of Madhya Pradesh, soil conditions can vary sharply even within the same district. So use local engineering advice, but always make sure it is written into the structural plan.
- Use the structural drawing as the final authority for depth.
- Understand that excavation may include allowance for base layers.
- Do not assume one standard depth fits every plot.
- Check soil condition before finalizing trench depth.
- Ask the engineer to explain the section clearly before work begins.
Warning:
JCB vs Manual Excavation: What Works for Small Plots
For plotted home construction, excavation is usually done either with a JCB or manually. A JCB is faster and often makes sense where access is easy and trenches are straightforward. On many sites, the hourly JCB rate is roughly in the Rs 800 to Rs 1000 range, though that varies by city, diesel cost, and local demand. In outer urban areas, machine excavation can save time and reduce labour dependency.
Manual excavation may still be useful where the plot is narrow, approach roads are tight, or the machine cannot work without disturbing adjoining property. It may also be needed for edge correction, depth refinement, or cleaning trench sides after machine work. In dense localities in cities like Varanasi, old Lucknow, or parts of Chennai, access constraints often make mixed-mode excavation more practical than relying on a machine alone.
The real question is not only speed, but control. Machine digging done too fast can overshoot depth or disturb trench edges. Manual work may be slower, but it allows more precision in final trimming. A good contractor often uses a JCB for bulk digging and manual labour for finishing the trench profile neatly before base preparation starts.
- Use JCB when site access and trench layout allow it.
- Use manual labour where precision or restricted access is needed.
- Check trench depth immediately after machine excavation.
- Do not allow over-digging without engineer approval.
- Budget for finishing work even if the main digging is mechanized.
Base Preparation: Sand Filling and PCC Before Footing
Excavation alone does not complete the foundation trench. Once the digging is done, the base needs to be prepared properly before footing reinforcement is placed. Many homeowners overlook this sequence: sand filling first, then PCC. This is a key part of creating a clean, level, and stable base under the footing.
Sand filling helps level the trench bottom and create a uniform layer where needed. A practical base layer is often in the range of a few inches, commonly around 3 to 4 inches, depending on the site condition and drawing. After that, PCC, or plain cement concrete, is laid above the prepared base. PCC creates a firm working platform, improves footing accuracy, and prevents reinforcement from sitting directly in soil.
This sequence matters because footing steel should not be placed over loose, dirty, or uneven trench soil. In residential construction across India, poor PCC work is one of the most overlooked site quality issues. If the base is sloppy, footing alignment, cover, and level all become harder to control. A clean base makes everything easier: steel placement, shuttering if used, and column starter positioning.
- Clean the trench bottom after excavation is complete.
- Add sand filling where the drawing or site condition requires it.
- Compact and level the base before PCC.
- Lay PCC evenly to create a proper working platform.
- Do not place reinforcement directly on bare soil.
Tip:
Footing and Reinforcement Should Match the Structural Drawing
After PCC is complete, the foundation moves into footing and reinforcement preparation. This is where the actual load-bearing system starts to take shape. The footing size, steel diameter, bar spacing, and column starter bars should come directly from the structural drawing. The rule here is simple: follow the drawing exactly.
For small house construction, many homeowners do not understand what they are seeing at site and therefore cannot question mistakes. But even basic awareness helps. The footing is usually wider than the column because it spreads the load into the soil. The steel inside the footing and the vertical steel in the column starter must be placed according to design, with proper spacing, cover, and tying. Ring spacing and bar sizes also matter because they affect the stability of the column cage.
If you are building a one-floor or two-floor house, column size and reinforcement may differ accordingly. On many small residential sites, people talk about 9 inch x 9 inch or 9 inch x 12 inch columns for certain situations, but these are not universal rules. In practical terms, a home in Jaipur, Bhopal, or Ranchi should not copy another site's column detail without design approval. Structural drawings exist to prevent exactly that kind of guesswork.
- Match footing width and thickness to the structural plan.
- Check bar diameter and spacing before pouring concrete.
- Ensure column starter bars are correctly placed and tied.
- Maintain proper concrete cover under footing reinforcement.
- Do not approve site changes unless the engineer confirms them.
One-Floor vs Two-Floor Foundation Planning
Many Indian homeowners begin with a ground floor house but want the option to add another floor later. That choice should influence the foundation stage immediately, not years later. If the house is likely to become G+1 in the future, the footing, column size, and reinforcement system may need to be designed from the start for that future load.
This is one of the most common questions on site: how much depth and what kind of column size are enough for one floor versus two floors. The correct answer is always design-based, but the important takeaway is that future expansion changes structural planning. If your intention is long-term vertical growth, say it before the first footing is dug.
This is especially relevant in fast-growing Indian towns where families build in phases. A ground floor in year one may become a two-storey house in five years. In such cases, cities like Pune outskirts, Lucknow expansion zones, or tier-2 locations in Bihar and Uttar Pradesh often see phase-wise construction. The mistake is not phased construction itself. The mistake is making a one-floor foundation and expecting it to safely carry an unplanned second floor later.
- Decide early whether future floor addition is likely.
- Tell the structural engineer before the drawing is finalized.
- Do not assume all small houses need the same footing system.
- Avoid copying nearby houses without checking structural logic.
- Build for your long-term load plan, not only today's budget.
Site Checks Before Moving to Plinth Beam Work
Excavation and foundation work do not end when the trench is dug or the footing steel is tied. Before moving forward to plinth beam stage, the site should be reviewed carefully. Check whether excavation depth matches the plan, whether footing reinforcement is in the correct position, and whether column starter bars are vertical and properly tied. This is the stage where small corrections are still possible.
Also confirm that the trench has not collected water, the trench sides have not collapsed, and the base has remained level after preparation. In monsoon-prone areas or low-lying plots, water control becomes especially important. A site in Kolkata, coastal Andhra, or low-lying eastern UP may need extra caution around trench stability and clean PCC surfaces before reinforcement is finalized.
Once concrete is poured, visibility reduces and correction becomes expensive. That is why disciplined homeowners ask for photos, dimension checks, and engineer confirmation before the next stage begins. A clean handover from excavation and foundation into plinth beam work creates fewer surprises in the rest of the structure.
- Recheck trench depth and footing dimensions before concreting.
- Confirm sand filling and PCC were completed properly.
- Inspect footing reinforcement and column starter positions.
- Keep water out of the trench before and during execution.
- Move to plinth beam only after technical verification.