Building a House
Construction StagesEssential
Back Filling and Anti-Termite Treatment
Use the right fill material, leave the correct floor level, and block termite entry before ground-floor work moves ahead.
11 min read· Last updated 12 Apr 2026
Why This Stage Deserves More Attention
After foundation work is done, many homeowners assume the difficult part is over. The next step looks simple: fill the empty space, level it, and move on. In reality, this is one of the stages where quiet mistakes create long-term problems. Poor back filling can lead to uneven floors, settlement, and cracks. Skipping anti-termite treatment can leave the house exposed from below before flooring and interiors even begin.
This is also the point where many people try to save money in the wrong place. Soil is already lying on site, so it feels natural to push it back in. Chemical treatment feels like something that can wait. Both decisions usually look harmless at first and become expensive later. Once the floor is cast and interior work begins, correction becomes harder, messier, and costlier.
A well-built house depends on what is hidden under the floor just as much as what is visible above it. In self-build homes across Lucknow, Patna, Jaipur, Indore, and Nagpur, this is one of those steps that separates a clean long-term build from a house that starts showing trouble too early.
- Back filling affects floor stability and long-term settlement.
- Anti-termite treatment reduces hidden risk before flooring starts.
- Both steps are cheaper now than after finishing work.
- Mistakes here usually stay invisible until damage appears.
- Good work at this stage supports the entire ground floor.
What Back Filling Means After Foundation Work
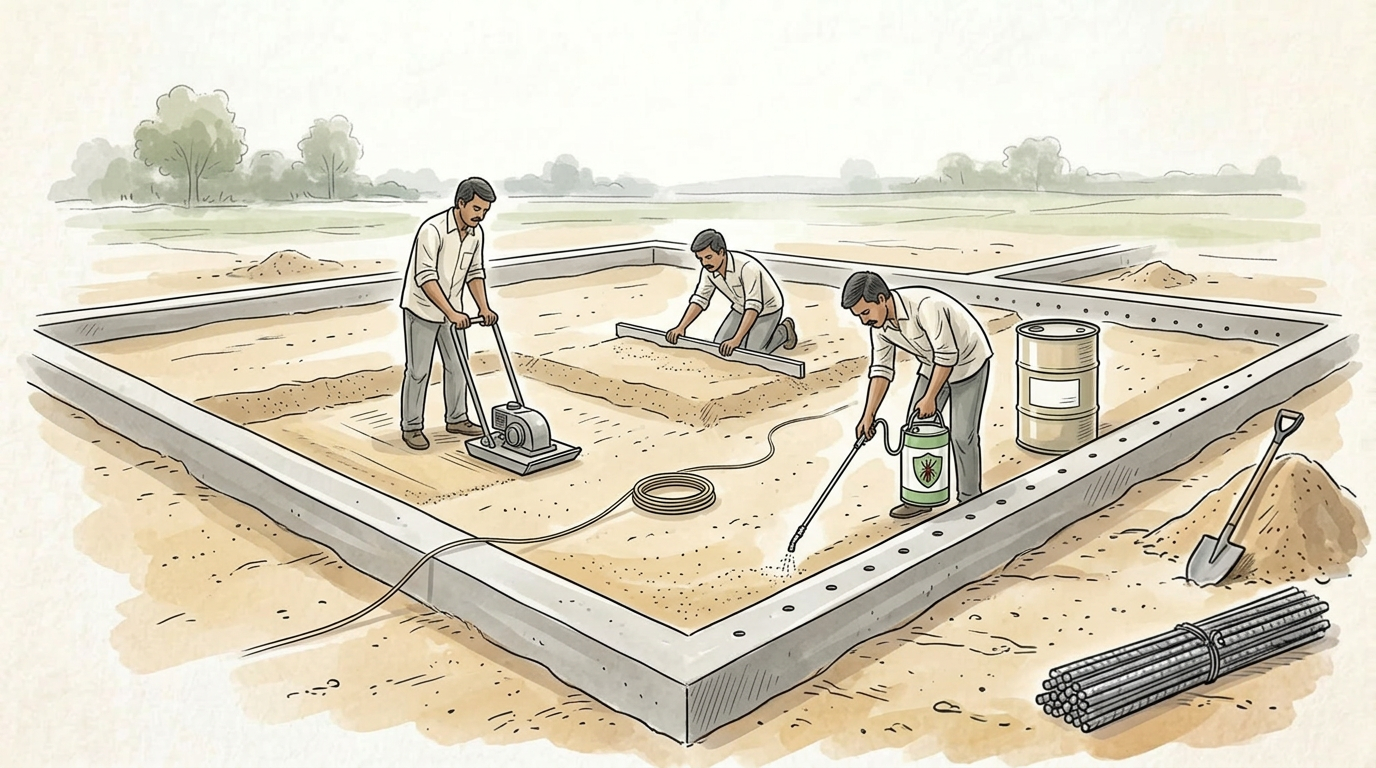
Back filling starts after the foundation, footing, and related underground civil work are complete. Once those parts are done, the open spaces inside the plinth area and around the foundation need to be filled back to the required level before the next floor stage begins. This is not a dumping exercise. It is a controlled base-building step.
The main purpose is to create a stable bed below the future floor. That fill should sit evenly, compact well, and hold level without excessive movement. If loose material is thrown back carelessly, the floor above it may settle in patches. That is when tiles begin sounding hollow, floor lines go uneven, or cracks start appearing where the owner least expects them.
The best way to think about back filling is this: you are rebuilding the ground level inside the plinth, but in a form that is more stable than random excavated soil. That is why material choice, layer thickness, and compaction all matter.
- Back filling begins only after foundation-stage work is complete.
- Its job is to rebuild a stable internal base for the ground floor.
- Fill material should be chosen, not pushed back casually.
- Compaction matters as much as the material itself.
- The target level should match the future floor build-up.
Why Sand Is Commonly Used Instead of Excavated Soil
One of the clearest practical points here is that the plinth should not simply be refilled with the same loose soil removed during excavation. On many plots, that soil is mixed with clay, roots, stones, broken debris, damp lumps, and uneven particles. It may look free, but it is not always reliable as a fill layer below a finished floor.
Sand is commonly preferred because it levels better, compacts more evenly, and does not behave like loose excavated spoil. It also helps reduce one more risk that homeowners usually ignore: termite movement through soil. In practical site terms, sand is harder for termites to tunnel through than soft, loose soil. That is one reason many contractors and engineers prefer it for plinth filling.
This does not mean every site uses exactly the same fill material. Local practice, cost, and site condition can change the decision. But where the goal is a clean, compact, low-risk plinth fill, sand remains one of the safest and most common choices in Indian residential construction.
Tip:
How to Fill the Plinth Area Properly
Good back filling is done in layers, not in one full dump. The material should be spread gradually, compacted, and checked for level before the next layer is added. This keeps the fill denser and more stable. If the entire area is filled in one go, the lower part often remains loose, and that weakness shows up later in the floor.
Another point that gets missed is the final floor level. The plinth should not be filled up to the finished floor by guesswork. You have to leave the correct thickness for what still comes above it. Depending on the construction method, that may include floor base, treatment, slab or bed, mortar, and final flooring finish. If this allowance is ignored, the next stage either sits too high or needs awkward correction.
This is where site supervision matters. A few inches of error in fill level may not look serious while the plinth is open, but it becomes very obvious when floor work begins. In many houses across tier-2 cities and small urban plots, this mistake is noticed only after money has already been spent on the next layer.
- Fill in layers, not in one uncontrolled heap.
- Compact each layer before adding the next one.
- Keep checking the level across the full plinth area.
- Leave the required thickness for the remaining floor system.
- Remove roots, debris, and waste before compaction starts.
Why Anti-Termite Treatment Should Be Done Now
Anti-termite treatment works best before the floor is closed. At this stage, the soil and fill area are still accessible, which makes it possible to create a protective barrier below the house. Once flooring, skirting, woodwork, and interior finishing are done, termite control becomes harder and far less convenient.
The risk is not limited to wooden doors alone. Termites can damage wardrobes, kitchen units, paper-backed laminates, stored items, books, and even cloth if the infestation spreads. By the time the owner notices damage above ground, the entry route may already be established below the floor.
That is why anti-termite treatment is not something to postpone casually. In warm and humid parts of India, and in plots with known termite activity nearby, early treatment is a basic precaution. It is much easier to protect the house now than to chase an infestation after the home is occupied.
Warning:
How Anti-Termite Treatment Is Usually Applied
The usual method at this stage is straightforward. After the fill reaches the required level, holes are made at regular intervals and anti-termite solution is poured into them after proper mixing with water as directed on the product label. The aim is to spread the chemical barrier across the vulnerable area rather than treating only a few visible spots.
The spacing mentioned in the source material is around one foot to one foot intervals in practical site terms. The exact method may vary slightly by product and local practice, but the important thing is consistency. Random sprinkling is not treatment. The area has to be covered properly, and the chemical has to be diluted exactly as instructed.
This is one of those steps where the homeowner should watch the process rather than just hear that it was done. What chemical is being used? What is the mixing ratio? Are holes being made across the full area? Is the treatment being applied before the floor layer closes the surface? These questions matter more than a verbal assurance from the contractor.
- Confirm the name of the anti-termite chemical being used.
- Check the label for the correct dilution ratio.
- Make sure holes are made across the treatment area, not just at random points.
- Ensure treatment is done before the floor is closed.
- Keep a note of the date and product for future reference.
Mistakes That Usually Cause Trouble Later
The first mistake is using the excavated soil just because it is available. That looks like a saving, but if the fill settles later, the cost comes back through repairs. The second mistake is treating anti-termite work as optional or doing only partial treatment in easy-to-reach places. That creates a false sense of safety.
Another common mistake is poor sequencing. Some sites fill the plinth before cleaning it properly. Some treat the area too late, after levels are already changed or floor work has partly moved ahead. Some ignore the remaining floor thickness and end up correcting levels with extra mortar or material later. All of this adds cost without adding quality.
There is also a simple habit problem on site: nobody measures, everyone assumes. The fill level is assumed. The compaction is assumed. The treatment coverage is assumed. Good site work at this stage is mostly about removing that guesswork.
- Do not use loose site spoil just to avoid buying fill material.
- Do not fill the plinth in one go without compaction.
- Do not apply anti-termite solution casually or partially.
- Do not lose track of the final floor build-up thickness.
- Do not move to flooring until fill and treatment are complete.
A Practical Sequence That Works on Site
Once foundation work is complete, clean the plinth area properly and remove unusable debris. Then start back filling with the selected material, usually sand where that is the chosen approach. Build the level gradually, compacting as the fill rises. Keep checking how much space is still needed for the upcoming floor layers.
After the fill reaches the right level, carry out anti-termite treatment across the full vulnerable area with the correct solution mix and spacing. Only after that should the next floor-preparation stage continue. That order matters because the treatment works best while the area is still open and accessible.
This is a simple stage when handled properly and an irritating one when rushed. The homeowners who face fewer floor and termite problems later are usually not the ones who spent the most money here. They are the ones who paid attention at the right time.
- Finish foundation work first.
- Clean the plinth area before bringing fill material.
- Fill and compact in layers up to the planned level.
- Leave the right allowance for the remaining floor build-up.
- Apply anti-termite treatment before closing the floor.
- Record what material and chemical were used.