Building a House
Construction StagesEssential
Door & Window Frame Installation
Fix frames and shutters at the right stage so openings stay aligned, termite-safe, and easy to finish later.
10 min read· Last updated 12 Apr 2026
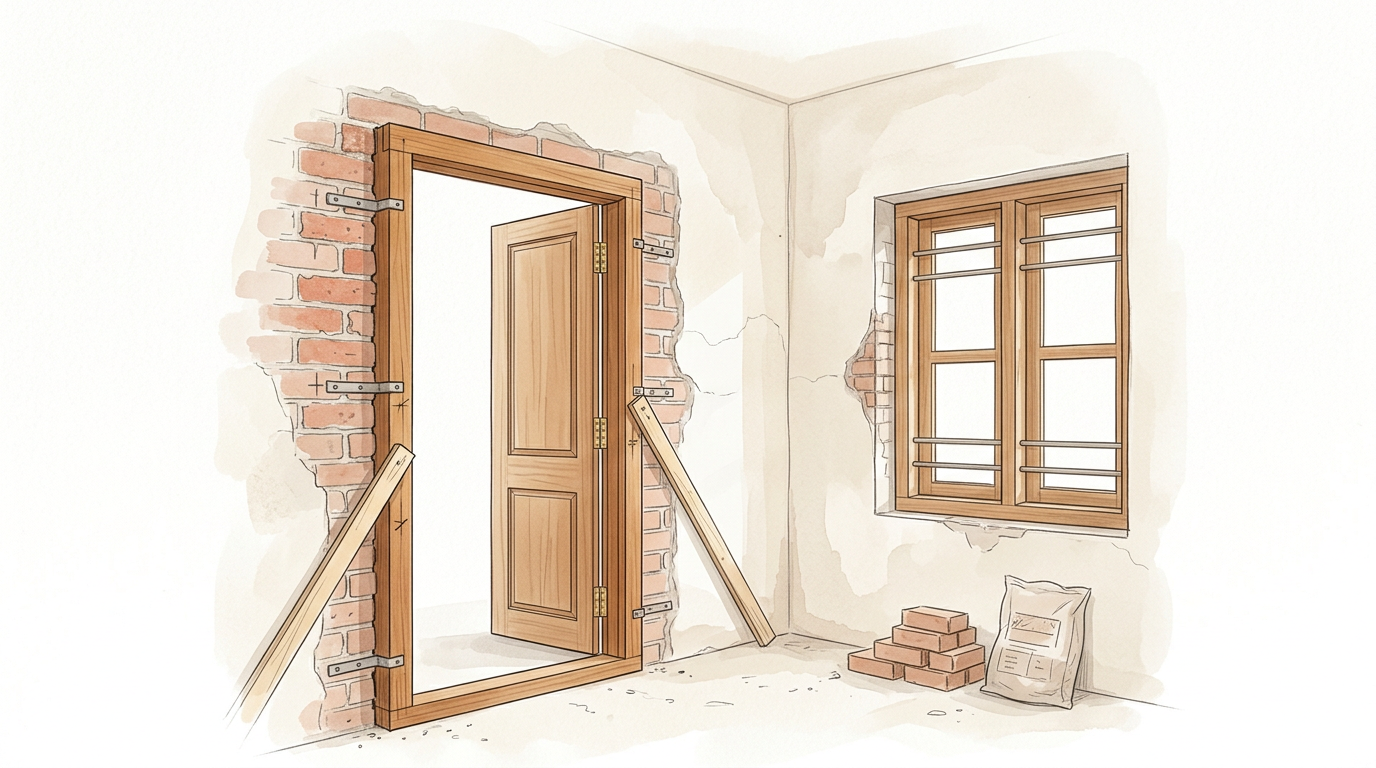
Why Door and Window Frame Installation Matters Early
Door and window frame installation is not a small carpentry step that can be adjusted anytime later. In a typical Indian house, the frame position controls plaster line, opening size, shutter fit, hardware placement, and even how clean the final finishing looks. If the frame is fixed carelessly, the result usually shows up later as rubbing shutters, uneven gaps, cracked plaster near the frame, or difficulty in locking the door properly.
This stage also connects masonry, carpentry, and finishing work. The frame normally gets fixed after the opening is ready and before final plaster is completed around it. That means the mason, carpenter, and site supervisor all need to work with the same measurements. In self-built homes across Lucknow, Hyderabad, Jaipur, and Patna, many frame problems happen because one team assumes the other has already checked the size and level.
The right approach is to treat every opening as a measured installation point:
- Confirm the opening size before ordering or preparing the frame.
- Fix the frame before surrounding plaster work is closed.
- Plan for shutter thickness, hardware, and floor level at the same time.
- Protect the wood from moisture and termite risk before installation.
- Keep frame fixing and shutter fitting as two linked stages, not separate afterthoughts.
Start With Correct Size, Gap, and Wood Protection
Before any frame is installed, the opening should be measured properly from width, height, and wall thickness. The frame cannot simply match the raw masonry opening edge to edge. A practical installation needs tolerance, finishing allowance, and enough control for proper alignment. If the frame size is wrong at this stage, later corrections usually mean cutting wood, patching masonry, or compromising the shutter gap.
Wood protection is equally important. If you are using a wooden frame, anti-termite treatment and wood primer should be completed before fixing it permanently into the wall. This matters even more in humid regions and termite-prone belts across Chennai outskirts, Bhubaneswar, Ranchi, and parts of Uttar Pradesh. Once the frame is embedded and plastered around, untreated portions are harder to access and long-term damage becomes costlier.
Use these sizing and prep rules before the frame goes into the wall:
- Measure the masonry opening in more than one place to catch variation.
- Confirm finished floor level before deciding the final door frame height.
- Apply wood primer or the specified protective coat before fixing the frame.
- Use anti-termite protection where wooden members meet masonry conditions.
- Check wall thickness so the frame sits correctly with the plaster line later.
How Wooden Frames Should Be Fixed in the Opening
Once the frame is prepared, the next step is fixing it firmly inside the opening. This is where clamps or holdfasts matter. Window frames typically use fewer holdfasts than door frames because the opening size is smaller, while door frames need stronger anchoring due to heavier daily use. The key objective is simple: the frame should not shift while masonry packing, plastering, or later shutter fitting takes place.
Support pieces are also important during fixing. Temporary diagonal or cross supports help maintain shape, especially in window frames where the four sides need to stay square. In door frames, support helps the frame remain stable while alignment is checked and surrounding work continues. If the support is removed too early or the holdfast fixing is weak, the frame can twist slightly, and even a small twist creates visible shutter problems later.
At site level, the execution should stay disciplined:
- Use the required number of holdfasts or clamps for door and window frames.
- Place temporary supports so the frame does not distort during fixing.
- Keep the frame stable before masonry or concrete packing starts.
- Coordinate carpenter and mason timing so the frame is not left loose in the opening.
- Recheck width and diagonals before locking the installation stage.
In many houses in Indore, Surat, Nagpur, and Noida, frame fixing gets rushed because the site wants to move quickly into plastering. That usually creates avoidable problems. A properly fixed frame should feel like part of the wall system, not like a wooden member waiting to be adjusted later.
Check Plumb, Level, Projection, and Concrete Infill
Frame fixing is only correct when alignment is correct. The frame must be checked vertically with a plumb line or equivalent site method, and horizontally with level reference so both sides remain true. This step cannot be replaced by visual judgement alone. A frame may look straight from one side and still be slightly out of plumb, which becomes obvious only when shutters are installed.
Projection relative to the wall face also matters. The frame should be positioned with the future plaster finish in mind so it neither sinks too deep nor projects awkwardly. If the installation does not account for plaster thickness, the finished reveal around the door or window looks uneven. On Indian residential sites, this is one of the most common reasons the final frame edge looks untidy even when the wood itself is good.
After the frame is aligned, the surrounding gap is packed and the holdfast zones are secured with concrete or the specified filling material. This is the stage where strength is locked in:
- Check vertical alignment with a plumb reference before filling.
- Check level and squareness before final fixing is completed.
- Maintain the intended frame position relative to the future plaster line.
- Fill holdfast pockets properly instead of stuffing them casually with weak mortar.
- Prevent disturbance for the next 24 hours so the frame does not move.
Why Curing and Site Protection Are Necessary After Frame Fixing
Once the frame is concreted into position, the job is not over. The filled zones around the holdfasts need proper curing so the fixing develops strength and does not loosen over time. This is especially important for main doors and heavily used room doors, where repeated opening and closing creates movement stress. If curing is skipped, the fixing can weaken even if the initial installation seemed acceptable.
Site protection during this period matters too. Freshly fixed frames should not be kicked, leaned on, or used casually by labour before the holding zones gain strength. On busy construction sites in Ghaziabad, Bhopal, and suburban Bengaluru, one of the most common problems is not wrong installation but damage caused after installation because the frame was treated like a stable finished element too early.
Use this simple post-fixing checklist:
- Frame alignment has been checked before concrete or packing was completed.
- Holdfast or clamp zones have been filled properly.
- Temporary supports remain in place until the frame is stable.
- Fresh fixing zones are protected from disturbance.
- Curing is done for several days as required by site conditions.
- Wood primer and anti-termite protection were applied before permanent closure.
- The frame face is still clean enough for later polishing or paint preparation.
As a practical rule, the site should also avoid allowing excess cement slurry or rough plaster damage to stain the visible wooden surface. Good protection now reduces sanding and finishing correction later.
How Shutters Should Be Fitted After the Frame Is Ready
Shutter installation comes after the frame has been fixed and stabilised. At this stage, the carpenter should size the door or window shutter according to the actual installed frame, not only the drawing. Small site variation is normal, so the shutter has to respect the real opening dimensions. Proper clearance is essential because wood responds to humidity. In monsoon-prone cities such as Kolkata, Kochi, and Mumbai, a shutter without enough tolerance can swell and start rubbing quickly.
The shutter should also have suitable thickness for the application. A door shutter is usually heavier and uses more hinges than a window shutter, while a window shutter is lighter and generally needs fewer hinges and simpler hardware. The important point is not memorising one universal size, but matching the shutter thickness, gap, and hardware strength to the actual usage of that opening.
Good shutter fitment depends on a few non-negotiable checks:
- Keep a practical clearance between frame and shutter for movement and smooth operation.
- Maintain bottom clearance above the finished floor level.
- Use properly fixed hinges instead of relying on shallow screw holding.
- Check opening and closing movement several times before final hardware tightening.
- Complete shutter sizing only after the frame position is confirmed stable.
The most common site mistake is making the shutter too tight because the owner wants a “full fit” look. That often feels good on day one but becomes troublesome once polish, moisture, and seasonal movement affect the wood.
Hardware, Finishing, and Final Checks Before Handover
After shutters are fitted, hardware selection and finishing quality decide whether the installation feels professional or makeshift. A normal wooden door may require hinges, handle sets, tower bolts, latch or lock arrangement, stopper, and sometimes safety hardware depending on use. Window shutters usually need hinges, handle, simple stay or hook arrangement, and reliable closing hardware. Every piece should suit the shutter weight and opening type instead of being chosen only by appearance.
Finishing also depends on the material choice. Solid wood, flush door shutters, and plywood-based shutters with decorative laminate or veneer all need different finishing logic. For inner rooms, many homeowners use flush shutters with laminate or sunmica, while premium projects may use polished wood shutters. Whatever the choice, the finish should come after the carpenter has confirmed smooth movement, hinge strength, and gap consistency.
Before accepting the work, do a practical room-by-room check:
- Open and close every door and window fully more than once.
- Check whether handles, tower bolts, hooks, and locks sit firmly.
- Confirm that no shutter scrapes the floor, frame edge, or plaster line.
- Look for uneven gap, hinge sag, or loose screw fixing.
- Ensure the visible frame and shutter surfaces are ready for final polish, paint, or laminate finish.
In self-construction projects across Jaipur, Hyderabad, Pune, and Lucknow, the cleanest results usually come when the owner checks movement and hardware before final polish or paint. Once the decorative finish is done, structural correction becomes slower and more expensive.