Building a House
Construction StagesEssential
Curing Process & Timeline
Start slab curing at the right time and continue it properly so your roof develops better strength, fewer cracks, and longer service life.
10 min read· Last updated 12 Apr 2026
Why Curing Matters After Slab Casting
Curing is the process of keeping fresh concrete moist for a defined period so cement hydration can continue properly. In simple site language, slab casting does not end when the concrete is levelled. The real strength gain starts after casting, and that strength depends heavily on moisture retention during the first few days. If the slab dries too early, the concrete can lose strength, develop surface cracks, and become more vulnerable to long-term seepage problems.
For homeowners in India, this stage is often neglected because the slab looks hard within a day. On self-built houses in Lucknow, Jaipur, Nagpur, and outer Bengaluru, many owners assume that once labour leaves after casting, the slab is safe. That is a costly mistake. A roof slab exposed to summer heat, wind, and direct sun can dry much faster than people expect, especially in April to June conditions across north and central India.
- Curing helps cement hydration continue properly.
- Proper moisture improves strength development in the slab.
- Early drying can cause shrinkage cracks and weak top surfaces.
- Good curing reduces future repair risk in waterproofing and plaster work.
- Slab curing should be treated as a structural task, not a casual water-sprinkling activity.
When to Start Curing After Concrete Becomes Hard Enough
The curing start time depends on when the concrete surface has set enough to receive water without damage. In most residential slab casts, curing begins the next day. In hot weather, concrete may become firm enough in around 10 to 12 hours, while in cooler weather or winter it can take closer to 24 hours. The safest practical rule is to inspect the slab the following morning and confirm that the surface is no longer soft before starting full curing.
This inspection matters because starting too early can mark the surface, while starting too late allows early moisture loss. In cities like Delhi NCR, Ahmedabad, and Hyderabad, where daytime heat can be severe, even a few extra dry hours can affect the surface badly. If the slab is dry and firm the next morning, begin wetting it immediately. Do not wait two or three more days thinking “concrete is already strong.” The first day is the most important point in the curing cycle.
- Inspect the slab surface the next morning after casting.
- Confirm that the concrete is set and not easily disturbed by water.
- Start curing as soon as the surface is ready, usually within 24 hours.
- Do not delay curing because the hydration window starts immediately after casting.
- In hot weather, monitor the slab more carefully because drying happens faster.
Tip:
Best Methods for Slab Curing on Indian House Sites
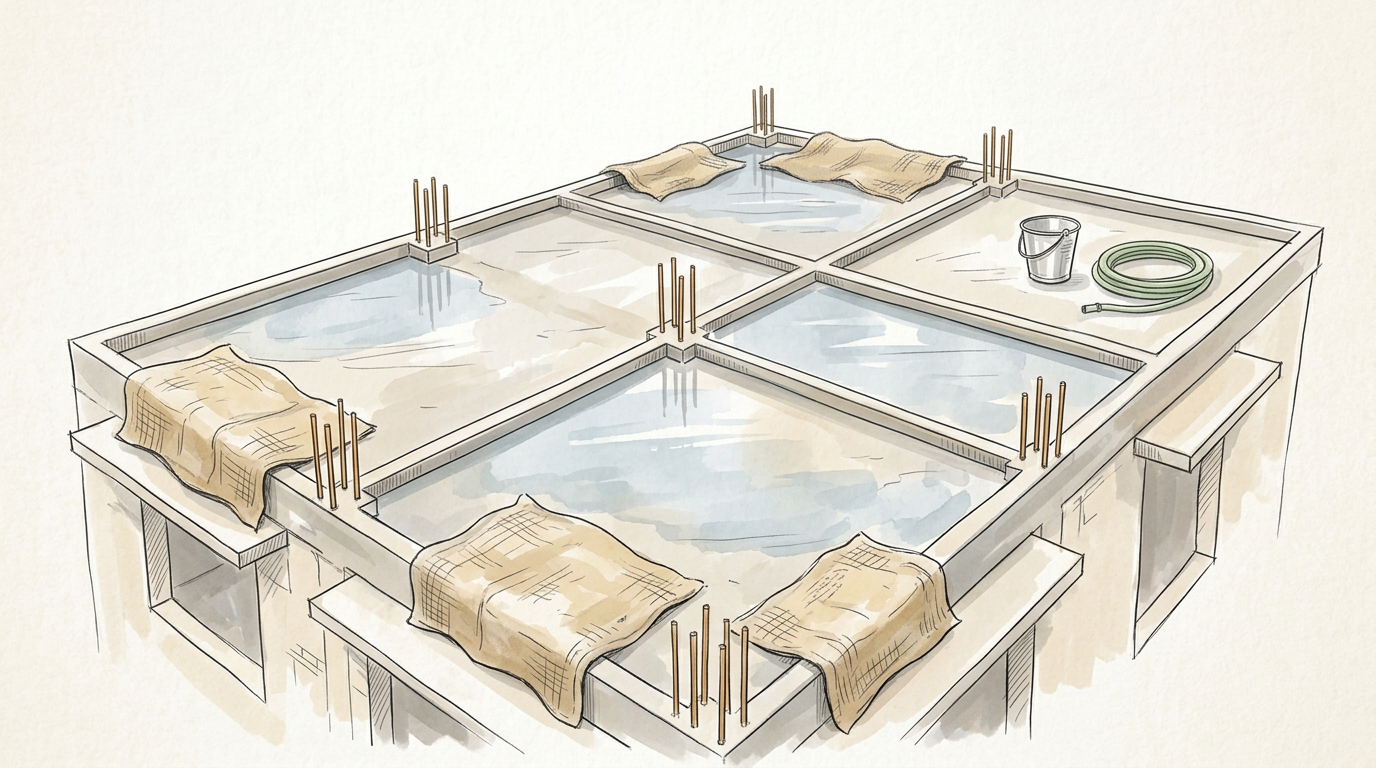
For roof slabs, the most practical and effective method is ponding. In this method, small bunds are created on the slab so water can stay in place instead of flowing away. Contractors usually make these temporary boundaries using cement mortar, sand-cement mix, or sometimes brick edge lines. Once the bunds are stable, the slab is filled with a shallow layer of water and kept wet continuously. This method is popular because it keeps moisture available across the slab instead of depending on repeated manual splashing.
Another workable method is using wet jute bags or cotton sacks spread over the slab surface. These bags hold water and slow down evaporation, which is especially useful where full ponding is difficult or where the roof has uneven levels, openings, or service projections. On many sites in Pune, Indore, and Coimbatore, labour also combines methods by first wetting the slab and then covering selected portions with wet sacks. Some masons use brick edging to stop water, which is acceptable as long as the water remains retained properly and does not leak away through weak joints.
- Use ponding where possible because it keeps the slab continuously wet.
- Build small mortar or brick bunds so water does not run off the roof.
- Use wet jute or cotton sacks where ponding is difficult.
- Refill water before the slab surface is exposed and dry.
- Check bunds regularly because seepage through broken edges can stop effective curing.
Recommended Curing Timeline for Slabs and Cement Type
The minimum curing period for normal concrete work should be 7 days, but for house roof slabs, longer curing is the safer standard. A practical residential approach is to treat 7 days as the bare minimum and 10 to 14 days as the preferred duration. This is especially important for roof slabs because they face direct sun, heat gain, and early drying. If blended cement or mineral admixture cement is used, the curing period should generally be extended because strength development benefits from longer moisture retention.
On a typical Indian house project, the first 7 days are critical and should never be skipped. From day 1 to day 7, the slab should remain continuously moist. From day 8 onward, continue curing up to day 10 or day 14 wherever possible. In independent homes in Chennai, Surat, and Bhopal, this longer curing period is one of the simplest ways to improve slab durability without changing the design or material cost. The cost is mostly attention, labour discipline, and water arrangement.
- Start curing within about 24 hours once the slab surface is ready.
- Maintain proper curing for at least 7 days as an absolute minimum.
- Prefer 10 to 14 days for roof slabs in self-construction projects.
- Extend curing when blended cement or admixture-based cement is used.
- Treat longer curing as a quality improvement step, not as unnecessary delay.
What Not to Do During the Curing Period
One of the most common site mistakes is allowing roof activity too early. Many owners let workers resume movement, stacking, marking, or material handling on the slab after only 2 or 3 days. That should be avoided. As a practical rule, no unnecessary activity should be done on the freshly cast slab for at least 5 to 7 days. If ponding is being done properly, this usually becomes obvious because the slab surface remains filled with water. But on poorly managed sites, people drain the slab early and start working on it long before it is advisable.
Another serious mistake is forgetting curing for the first few days and then trying to restart it later. Once the early hydration window is lost, delayed water application cannot fully recover the strength that proper early curing would have supported. This problem is common on small residential sites where the contractor moves to another project after casting. If the homeowner or supervisor does not actively monitor curing, the slab may stay dry for four or five days and then receive water too late. That is not proper curing; it is only late wetting.
Warning:
- Do not allow heavy movement or routine work on the slab for the first 5 to 7 days.
- Do not drain ponding water just to speed up the next construction activity.
- Do not assume occasional splashing is equal to continuous curing.
- Do not leave curing entirely to labour without checking it yourself.
- Do not restart curing after a long dry gap and assume the slab is now safe.
Homeowner Checklist for Monitoring Slab Curing Properly
Homeowners do not need to do engineering calculations to supervise curing well. They only need to check whether water is actually staying on the slab, whether the method is continuous, and whether someone responsible is assigned daily. This matters even more in plotted homes where the owner visits only once or twice a day. In places like Patna, Noida extension, and suburban plots around Kochi, poor supervision is often the real reason curing fails, not lack of water or labour.
You should also connect curing to broader site planning. If the roof slab is under direct sun, ensure water availability is arranged in advance through tank storage, pump, or temporary hose line. If the contractor is absent, instruct the supervisor or family representative clearly. A slab that receives disciplined curing for 10 to 14 days usually performs better in crack control and long-term serviceability than one that receives casual site attention for just 2 or 3 days.
Use this checklist during the curing period:
- Curing started within about 24 hours after casting, once the slab surface set.
- The slab is being kept continuously moist, not allowed to dry in between.
- Ponding bunds, brick edges, or sack covers are intact and functioning properly.
- Water supply is arranged daily through tank, pipe, pump, or labour schedule.
- No unnecessary activity is happening on the slab during the first 5 to 7 days.
- Curing is continuing for at least 7 days and preferably up to 10 to 14 days.
- The contractor or supervisor has been clearly told that curing is mandatory.
- Visit the site daily or assign a trusted person to verify curing physically.
- Check whether water is retained, not just sprinkled once and forgotten.
- Ask what cement type was used so curing duration can be judged properly.
- Keep water logistics ready before casting day ends.
- Record the curing start date and planned end date so the process is not cut short.