Building a House
Construction StagesEssential
Brickwork Around Lintel Level
Plan masonry below and above lintel level correctly so openings, ventilation, beam height, and slab prep all work smoothly.
10 min read· Last updated 12 Apr 2026
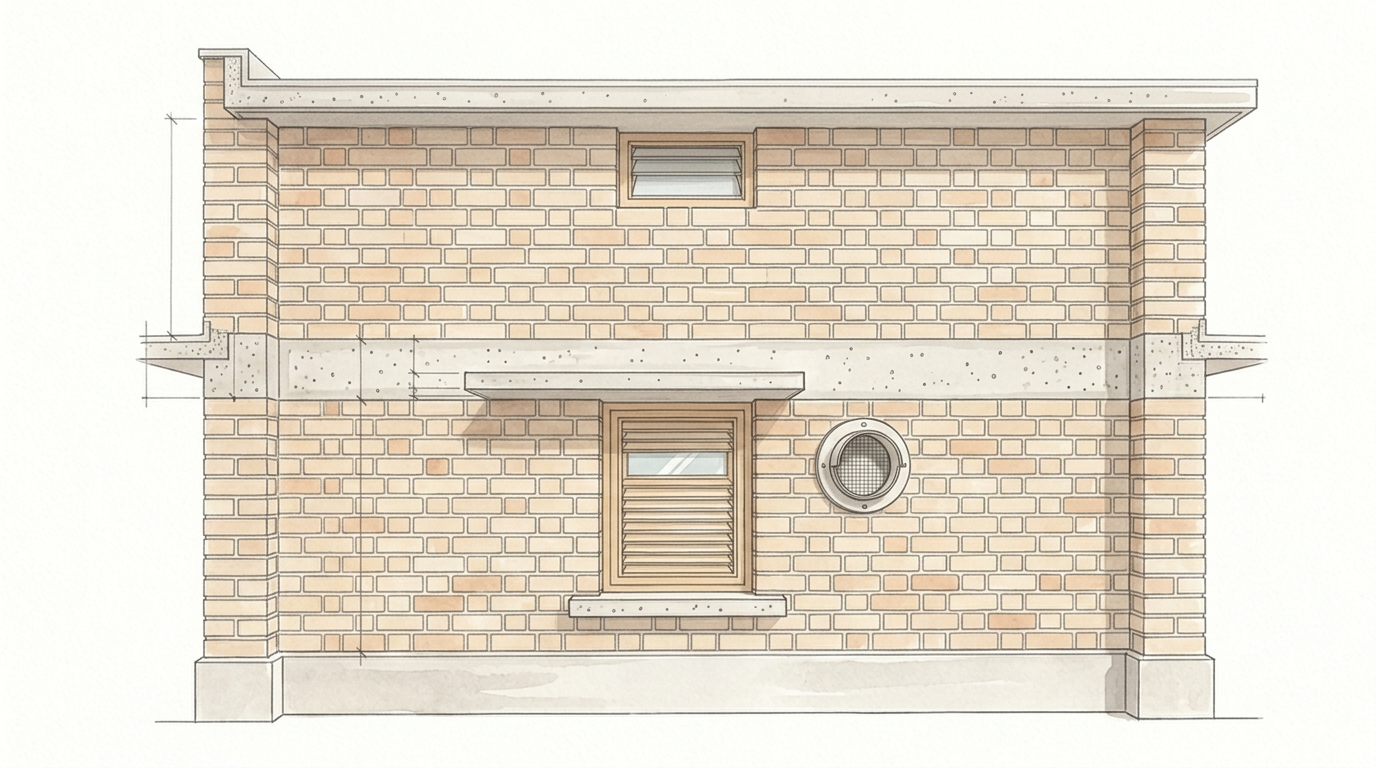
What Brickwork Above Lintel Level Really Means
Brickwork above lintel level is the masonry done after the lintel or tie beam at lintel height is cast and before the roof slab is prepared. In a typical Indian house, this is the wall portion that rises from the top of doors and windows toward the slab. It may look like simple leftover wall work, but in reality it controls ventilation, exhaust placement, beam coordination, and final room height.
Many homeowners focus on footing, columns, and slab casting, but the lintel-to-roof zone is also a critical decision stage. If this masonry is done casually, the site may block ventilators, misplace exhaust sleeves, or create mismatch between beam depth and wall top level. These mistakes are easy to ignore before slab work starts, but they become expensive once shuttering, steel, and concrete work begin.
This stage matters even more in kitchens, bathrooms, and stores, where poor planning affects airflow and daily usability. In houses across Lucknow, Jaipur, Ranchi, and Hyderabad, the difference between a comfortable room and a stuffy one is often decided here, not after finishing.
- It is the wall portion built between lintel level and slab level.
- It affects room height, ventilation, and exhaust fan placement.
- It must coordinate with beam depth and roof slab planning.
- It is more than routine masonry in kitchen and bathroom zones.
- It should be checked before shuttering and slab staging begin.
Start With Correct Brickwork Below Lintel Level
Good brickwork above lintel level starts with disciplined work below lintel level. The wall layout should follow the brick layout plan, with external walls and internal partitions placed correctly before masonry rises. Door and window openings must be left exactly where planned, not "adjusted" later by the mason. If the base layout is wrong, the upper masonry, lintel beam, and slab line will all be affected.
Below lintel level, window sill height also matters. In many homes, sill level is kept around 3 feet from finished floor level, while lintel level may be around 7 feet depending on design. Brickwork should rise only up to the required sill or opening level where a window is planned. The site should not continue brickwork through the opening and then break it later, because that wastes material and affects finish quality.
This is also the stage to prepare fixing points for door or window frames and any clamps or holdfasts needed in columns or walls. On self-managed sites in Patna, Kanpur, and Bhopal, one common mistake is remembering these fixing points only after casting or after masonry is complete. That leads to cutting, drilling, or weak frame anchoring later.
- Follow the brick layout plan from the start.
- Leave door and window openings in the correct position.
- Build window walls only up to sill level before the opening.
- Prepare frame and clamp fixing details early.
- Treat below-lintel accuracy as the foundation for above-lintel work.
Tip:
How to Plan Ventilation and Exhaust Openings Properly
Ventilation above lintel level is one of the biggest reasons this stage needs supervision. In a normal room, a small top ventilator helps hot air escape and keeps the space from feeling boxed in. In kitchens and bathrooms, the issue is even more practical because airflow directly affects smell, humidity, and long-term maintenance.
For many Indian houses, a small ventilator opening is kept near roof level, often around 1 foot by 1.5 feet depending on room need and design. Kitchens and bathrooms usually need more deliberate planning because they may require both ventilation and an exhaust fan. If the exhaust opening is kept too close to the slab or beam, fixing becomes awkward. If it is placed without thinking about future storage lofts or ceiling level, it may become useless.
The right approach is to decide room by room whether you need only a ventilator, only an exhaust opening, or both. In cities like Indore, Pune, Bhubaneswar, and Delhi NCR, many homeowners now prefer exhaust sleeves in kitchens and bathrooms because sealed windows and modular layouts are more common. These openings should be made during brickwork, not after plaster or tiles start.
-
Finalise whether the room needs a ventilator, exhaust, or both.
-
Keep kitchen and bathroom airflow planning separate from bedroom planning.
-
Mark the exact opening position before the wall reaches top level.
-
Coordinate the opening with slab edge and beam depth.
-
Do not leave the decision to the last day of masonry.
-
Use preplanned sleeves where round exhaust openings are needed.
-
Avoid hammer-cut openings after brickwork is complete.
-
Check that the sleeve size matches the intended fan size.
-
Keep the opening level and properly supported in masonry.
-
Confirm the electrician and finishing team know the exact position later.
How Kitchen, Bathroom, and Store Conditions Change the Detail
Not every room should be handled the same way. Kitchens and bathrooms often need a more practical opening layout because they may also have lofts, exhaust fans, or lower internal ceilings. If a store slab or loft is planned above a bathroom or utility area, the ventilation and exhaust position needs extra care because the air path changes once that loft is built.
If a store is created above a bathroom or a ceiling/loft is introduced at lintel level, the ventilation may remain below that loft and the exhaust also needs to be placed lower so the fan can be fixed properly. If there is no loft, the exhaust can remain closer to the top zone, but still not so tight under the slab that anchor fixing becomes difficult. These details seem small during masonry, but later they affect carpentry, electrical work, and airflow performance.
For circular exhaust openings, many site teams use a PVC pipe sleeve cut to wall thickness and inserted while doing masonry. That is usually cleaner than breaking the wall later or trying to shape a rough opening with bricks. If a ready sleeve is not planned, the final finish often looks patched.
- Kitchen openings must account for exhaust fan and future cabinets.
- Bathroom openings must account for privacy and moisture removal.
- Store or loft planning changes where air can move.
- PVC sleeves usually give cleaner exhaust openings.
- Treat each room separately before masonry closes.
Warning:
How to Check Height, Beam Depth, and Ceiling Line
One of the most overlooked parts of above-lintel brickwork is level coordination. Homeowners often speak about room height in feet, but the visible room height depends on slab level and beam depth together. If those are not checked before the last brick courses, the site may create confusion for slab shuttering or produce an uneven ceiling line after finishing.
For example, if the planned floor-to-roof height is around 11 feet, the slab thickness and beam depth still change what the finished ceiling feels like. A slab may be about 5 inches thick while a beam may be 12 inches deep, which means the beam can project below the slab line. The top brickwork has to match the structural drawing, not just a rough assumption that "the slab comes here."
Where no beam is coming below, the wall top may continue closer to slab support level. Where a deeper beam runs, the masonry top must stop at the correct line so shuttering and slab preparation stay clean. This level check is especially important in houses where beam drops vary room to room.
-
Fix the reference from finished floor level, not guesswork.
-
Check slab thickness and beam depth before the last brick courses.
-
Match the top of brickwork to the structural drawing, not only site habit.
-
Review rooms individually where beam drops are different.
-
Mark final top level on walls before masonry closes.
-
The masonry team should know where the slab and beam sit.
-
The shuttering team should receive clear top levels in advance.
-
Homeowners should review one final level line before slab prep begins.
-
Any mismatch is easier to correct now than after slab casting.
-
Roof-stage smoothness often depends on this coordination.
Mortar, Brick Thickness, and Execution Checks
For normal residential brickwork above lintel level, the quality of mortar and line control matters just as much as below lintel level. A common site practice is 1:6 cement mortar, with one part cement and six parts sand, subject to the engineer's instructions. The more important question for homeowners is whether the mix is consistent and whether joints are kept neat and controlled.
Joint thickness should generally be controlled and not allowed to become unnecessarily thick. On site, masons often work with around 10 mm mortar joints, with small variation depending on the brick. Brick quality, plumb, line, and alignment should be checked with thread line and plumb bob, especially in the last courses where people tend to rush before slab work.
Wall thickness also has to remain consistent with the wall type below. External walls, partitions, and upper masonry around ventilators should not be improvised casually. After masonry is completed, curing still matters. The mortar needs water for proper bonding, and neglecting curing is one of the easiest ways to weaken brickwork, whether below or above lintel level.
- Confirm the mortar mix is being followed consistently.
- Check verticality and level before the wall closes at the top.
- Verify the size and position of ventilators and exhaust sleeves.
- Ensure wall thickness matches the planned masonry type.
- Check that openings are not weakly supported or misaligned.
- Inspect the last brick courses before slab work starts.
- Ensure curing starts properly after masonry is complete.
- Top-course care improves later plaster and tile finish.
- Clean openings reduce rework for electrical and exhaust fitting.
- Good alignment makes loft and storage detailing easier.
- Stable upper masonry supports better long-term finish quality.
- Small mistakes at this stage are visible for years after possession.
What Homeowners Should Finalise Before Moving to Roof Slab
Before the site shifts from brickwork above lintel level to slab casting, the homeowner should close a short but important checklist. First, confirm the room height from finished floor reference. Second, confirm every ventilator and exhaust opening room by room. Third, ensure frame fixing, loft planning, and upper-wall services have been thought through. Fourth, inspect the top brick courses for alignment, bonding, and beam coordination.
It is also a good time to take stage photos. Once shuttering, reinforcement, and slab work begin, these details become less visible. A few photos of kitchen exhaust sleeves, bathroom ventilators, beam lines, and top brickwork can prevent disputes later, especially in labour-contract construction in cities like Nagpur, Ghaziabad, or Surat.
- Finalise openings before slab shuttering starts.
- Recheck beam depth and top brick level from floor reference.
- Review kitchens, bathrooms, and stores separately for airflow needs.
- Take photos of all upper-wall provisions before they are covered.
- Move to slab work only after room-wise checks are complete.